
Freshly Milled Soft Wheat Sourdough Bread
Can you bake sourdough bread with freshly milled soft wheat flour? Yes! This recipe shows you how by working with soft wheat’s natural qualities, not against them.
This post may contain affiliate links. If you click through and make a purchase, I may earn a small commission at no extra cost to you. As an Amazon Associate, I earn from qualifying purchases.

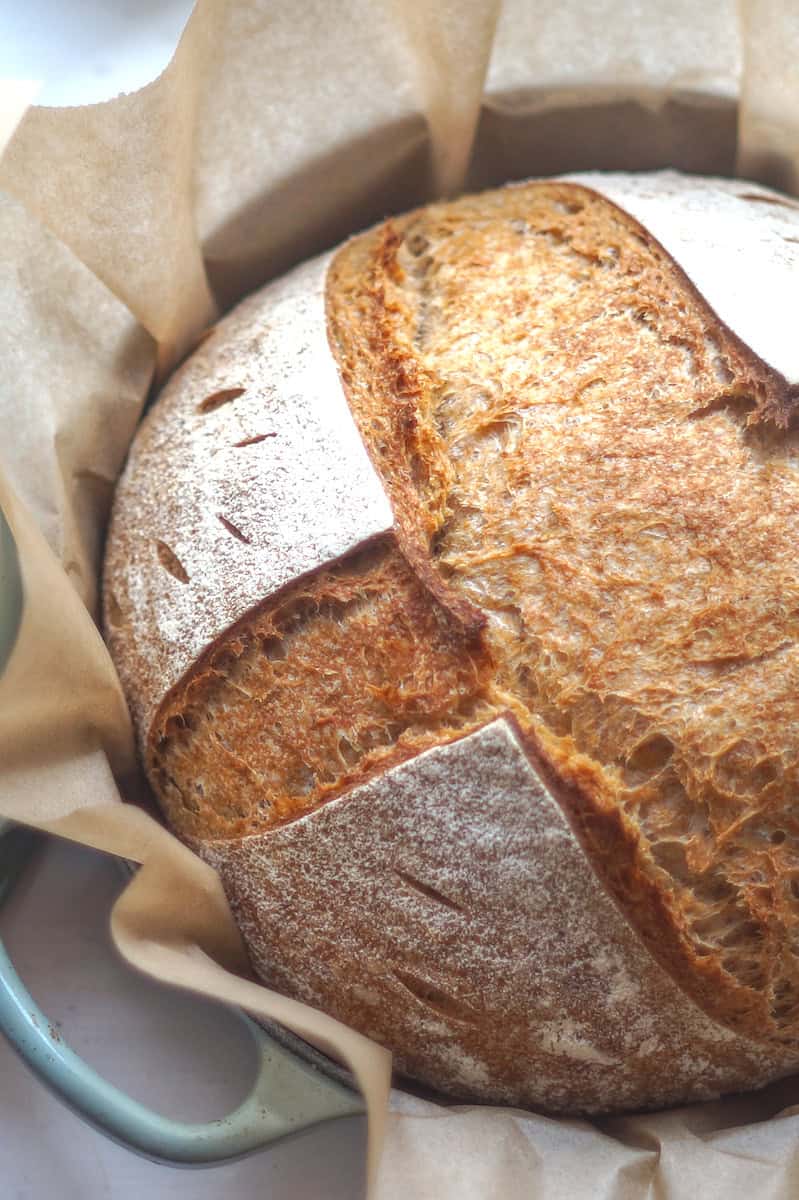
This is my go-to soft wheat sourdough bread: a freshly milled, beginner-friendly loaf designed around the natural qualities of softer wheats. It is flexible with flour blends, full of flavour, and shows that soft wheat flour can make excellent everyday sourdough bread.
Rather than trying to make soft wheat behave like high-protein bread flour, this recipe works with what makes soft wheat special: its naturally softer gluten structure, rich flavour, and tender crumb. Because soft wheat behaves differently from strong bread flour, this loaf uses a moderate hydration approach: just enough water to create a soft, flavorful crumb without making the dough unpredictable or difficult to shape.
High-hydration recipes are beautiful, but they are best suited to strong, high-gluten flours and experienced bakers. For everyday baking, especially when working with softer wheats, heritage grains, or freshly milled flour, this more moderate dough strikes a better balance.
This bread celebrates a different kind of sourdough crumb. Instead of chasing the large, open holes often seen in high-hydration white sourdough, this loaf offers:
- Great, mild flavor from same-day fermentation
- A tender, even crumb with just enough chew
- A dough that’s manageable, flexible, and reliable
It’s the kind of loaf that’s easy to build a habit around. Nourishing, no-fuss, and satisfying to make.
Yes, you can make bread with soft wheat!
Freshly milled soft wheat makes incredible sourdough bread. These recipes were developed specifically for soft wheat flour, so you can bake with confidence.
Explore more fresh milled soft wheat sourdough recipes:
Why Soft Wheat Flour Works for Sourdough Bread
For many Europeans, soft wheat flour is just flour. It’s the flour we use for everything from cakes to crusty loaves, and baking good bread with it isn’t unusual.
This recipe isn’t trying to imitate a high-hydration loaf made with strong bread flour, the kind built around dramatic oven spring and oversized holes.
Instead, it is closer to the everyday breads found throughout Europe: soft but substantial, with a fine, even crumb, a crisp crust, and a flavor that lets the grain shine.
Trying to chase a towering, ultra-open crumb with soft wheat is like chasing a unicorn with a butter knife on a rainy Thursday morning: possible, but not really worth the headache.
Consider this: one reason soft wheat flour feels unfamiliar to many bakers is that modern bread culture in some parts of the world, especially online, places a strong emphasis on high-protein bread flour. But many traditional European breads developed using the wheat varieties and flours that were locally available. Great bread has never depended on one specific type of flour. It depends on understanding the grain you’re working with.
So, don’t let aesthetics convince you otherwise. Soft wheat is a solid, reliable choice for bread. It’s just not interested in getting likes.
New to baking with soft wheat?
This guide walks you through what to expect when baking with soft wheat flour, and how to make the most of it.
How to Bake Sourdough Without Bread Flour: A Soft Wheat Guide →
Wonder how to bake bread with freshly milled flour?
Learn more about the unique quirks of using fresh flour and how it affects your baking, including (sourdough) bread baking and hydration advice.
Baking with Freshly Milled Flour: How to Adapt Recipes for Bread and More →


What Flours Work for This Bread? (Freshly Milled & Store-Bought Options)
This recipe was developed for freshly milled soft wheat flour, but it also works with suitable store-bought whole wheat flours.
- Freshly Milled Soft Wheat Flour
If you have access to a grain mill, milling your own soft wheat gives you the freshest, most flavorful flour possible. In Europe, wheat berries are often labeled simply as “wheat.”
You can also experiment with blends. Spelt or khorasan (Kamut®) can add character in blends up to 40%, while rye works well in smaller amounts of up to 15%. - Whole Wheat Flour
Look for 100% whole wheat flour, ideally milled from soft wheat. In many European countries, whole wheat flour is commonly made from softer wheat varieties. In other regions, soft wheat whole wheat flour may be harder to find. If that’s the case, a Whole Wheat Pastry Flour with at least 10% protein is often the closest match in the U.S.
Note: Depending on your flour (and the consistency of your sourdough starter), you may need to adjust the hydration a little. Different flours absorb water at different rates, so feel free to add small amounts (think teaspoons) of water if the dough feels too dry or a little more flour if it’s too sticky.
Don’t be afraid to experiment and learn what your flour needs. Every flour has its own personality, especially freshly milled flour. Small adjustments are part of learning how your grain behaves.
Tools You May Need
Large mixing bowl: Essential if you’re baking by hand
Danish dough whisk (optional): For mess free mixing when baking by hand
Stand mixer (optional): It will develop the gluten most efficiently and it’s hands free.
Grain mill (optional): Fresh milled flour brings the best flavor to the table but you can still bake great bread without it.
Banneton basket (optional): You could also use a medium-large bowl lined with a clean tea towel.
Dutch oven (optional): A dutch oven is the easiest way to get a consistently great crumb in any oven.
Baking Timeline for Freshly Milled Soft Wheat Sourdough Bread
|
Feed your starter the night before so it’s active and bubbly in the morning. |
|
|
08:00 AM |
Mill your grains and mix all ingredients into a shaggy dough. |
|
08:30 AM |
Knead the dough and bulk ferment at room temperature (or perform stretch and folds for the following 90 minutes). |
|
04:30 PM |
Shape the dough and place in a banneton. Proof at room temperature for 30–60 minutes—up to 90 minutes if your kitchen is cool or your starter is slow. Or refrigerate overnight (up to 12 hours) for even better flavor and easier scoring. |
|
05:30 PM |
Preheat oven with a dutch oven inside. |
|
06:00 PM |
Score your bread and transfer it to the hot dutch oven. Close the lid and bake. |
|
06:20 PM |
Take off the lid and keep baking. |
|
06:40 PM |
Remove the finished bread from the dutch oven and let cool. |
How to Make Soft Wheat Sourdough Bread (Step-by-Step)
This recipe was developed specifically for soft wheat flour.
From flour to loaf, in seven steps:
Step 01
Mix & Fermentolyse

If using freshly milled flour, grind your soft wheat berries on the finest setting of your grain mill.
In a large bowl (or the bowl of a stand mixer), combine flour, water, salt and starter.
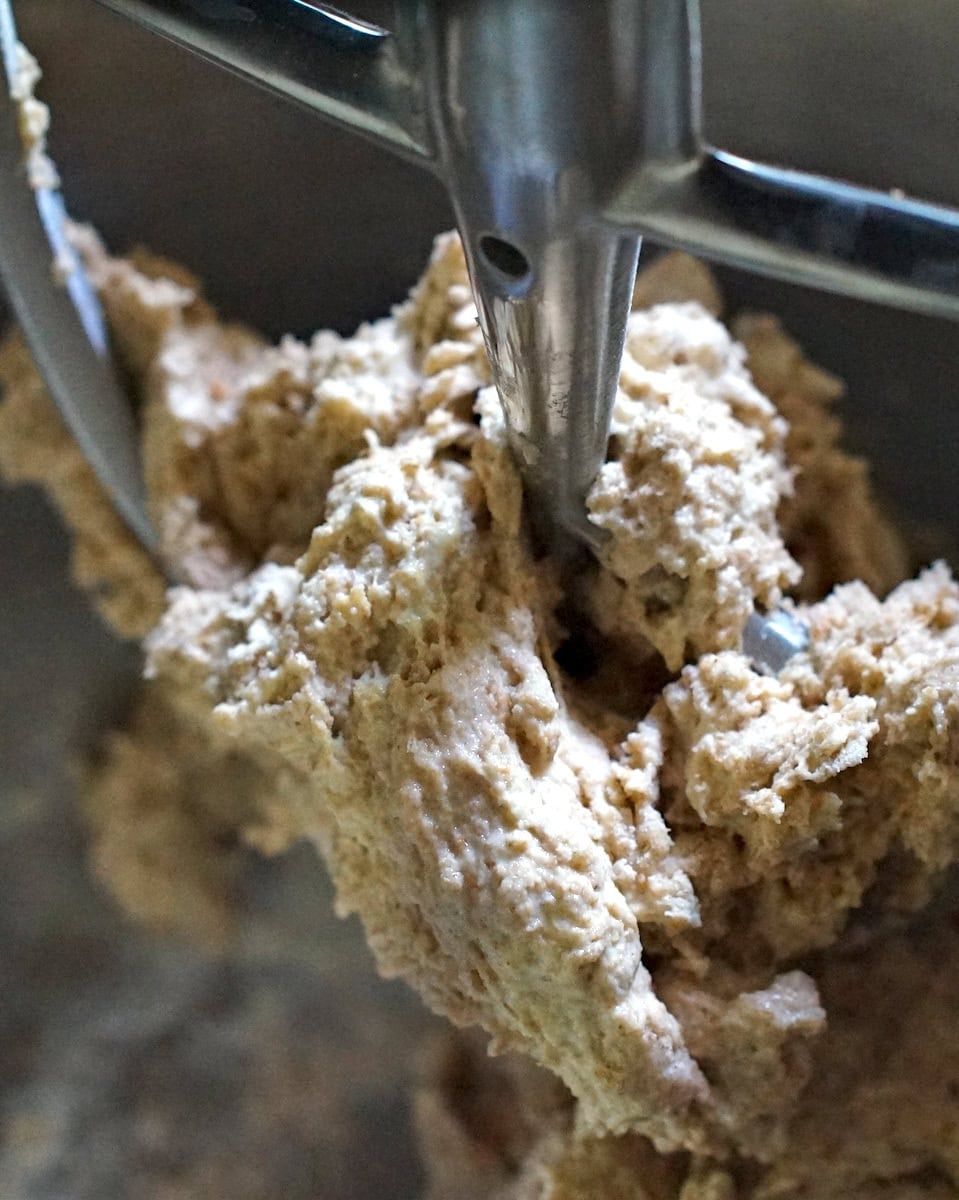
Mix until no dry bits remain. The dough should be shaggy, soft, and only slightly sticky.
Cover and rest for 30–60 minutes to rest (fermentolyse). This helps the flour absorb the water and begin gluten development.
Step 02
Knead
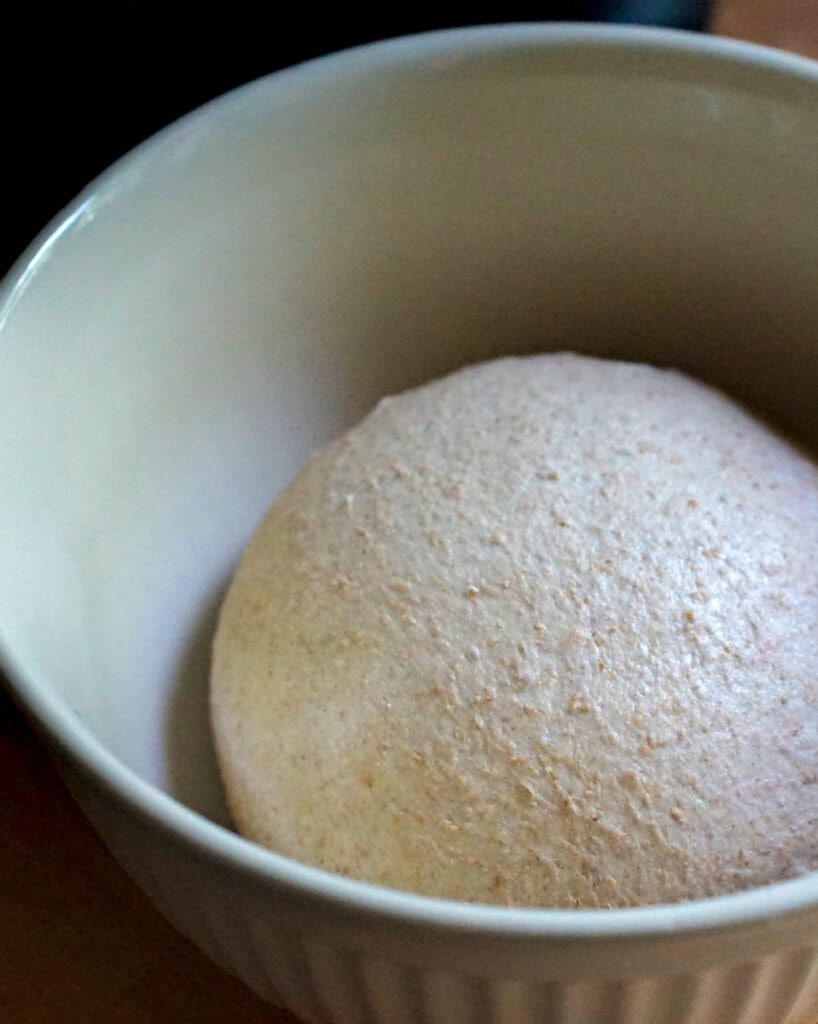
Choose one path: stand mixer or by hand:
stand mixer
Switch to the dough hook and knead on low speed for 5–10 minutes, until smooth and stretchy. It should pass the windowpane test. If the bowl of your stand mixer is very large, transfer the dough to a smaller bowl. That way it’s easier to tell when it has doubled.
→ You can skip the stretch and folds.
by hand
Knead gently for 5–10 minutes until the dough comes together. It doesn’t need to be perfectly smooth, just cohesive and no longer sticky.
→ Rest for 30 minutes, then continue with stretch and folds below.
Step 03
Stretch & Folds (hand-kneading only)

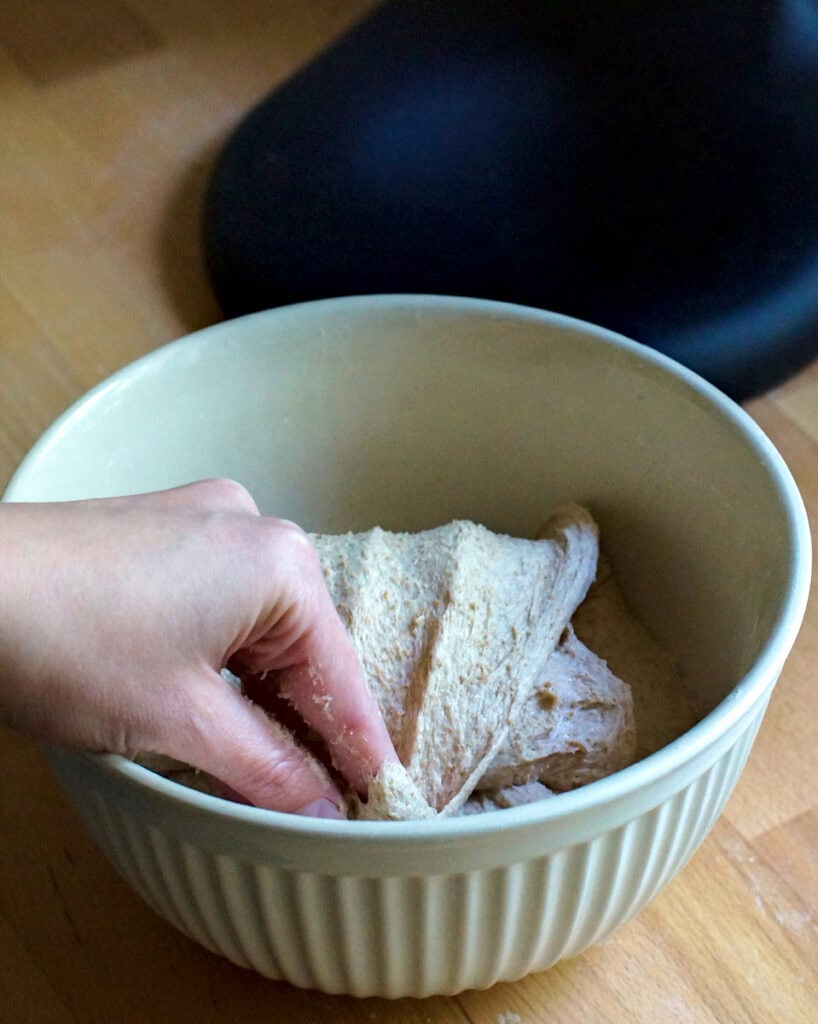
Wet your hands. Grab one side of the dough, stretch it up gently, and fold it over itself. Rotate the bowl a quarter turn and repeat at least 3 more times, or until you feel tension increasing.
Let rest 20–30 minutes.
Repeat for 2–3 total sets, letting the dough rest between rounds.
After the final stretch and fold, cover and bulk ferment.
Step 04
bulk ferment

Let the dough rise at room temperature (ideally 21–24°C / 70–75°F) for 5–7 hours. You’re looking for:
- A dough that’s roughly doubled in size
- Puffy, domed top
- Some visible bubbles near the surface
Don’t overproof: it should still have some structure and feel soft and puffy.
Step 05
Shape

Lightly flour a banneton (or a medium bowl lined with a clean tea towel). Flour the counter and the dough’s top.
Wet your hands and gently release the dough from the sides of the bowl. Turn the dough out, smooth side down.
Note: Soft wheat forms a weaker gluten network, that’s broken down more quickly during fermentation. If you’re unsure or facing over-proofing issues, I’ve got more tips on fermentation and troubleshooting in my full guide.


Shape into a rectangle. Fold the top third down, bottom third up, then fold the sides in towards the middle.

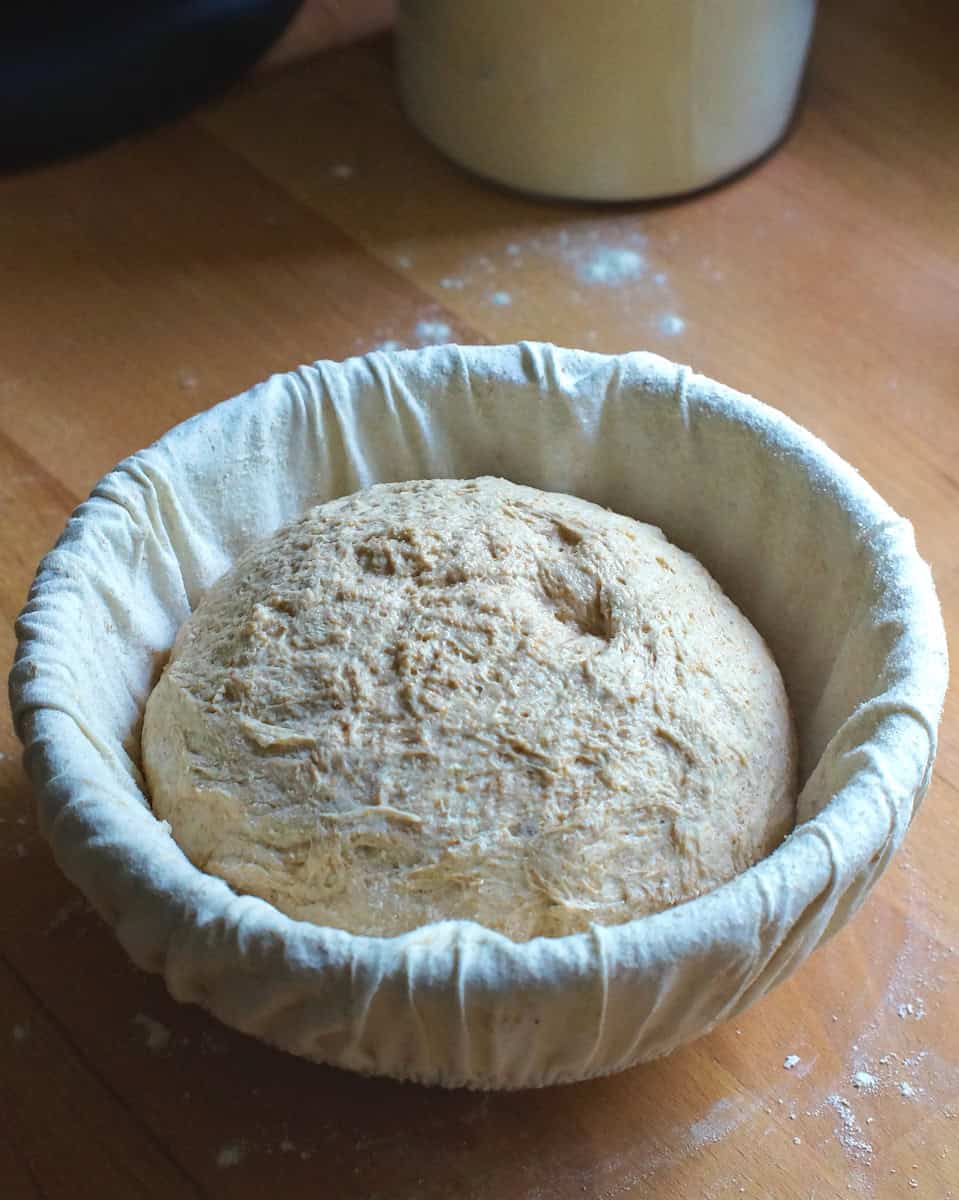
Flip seam side down. Cup your hands around the dough and gently pull it toward you to build surface tension. Turn and repeat until taut.
Place into your prepared banneton, seam side up.
Step 06
Proof
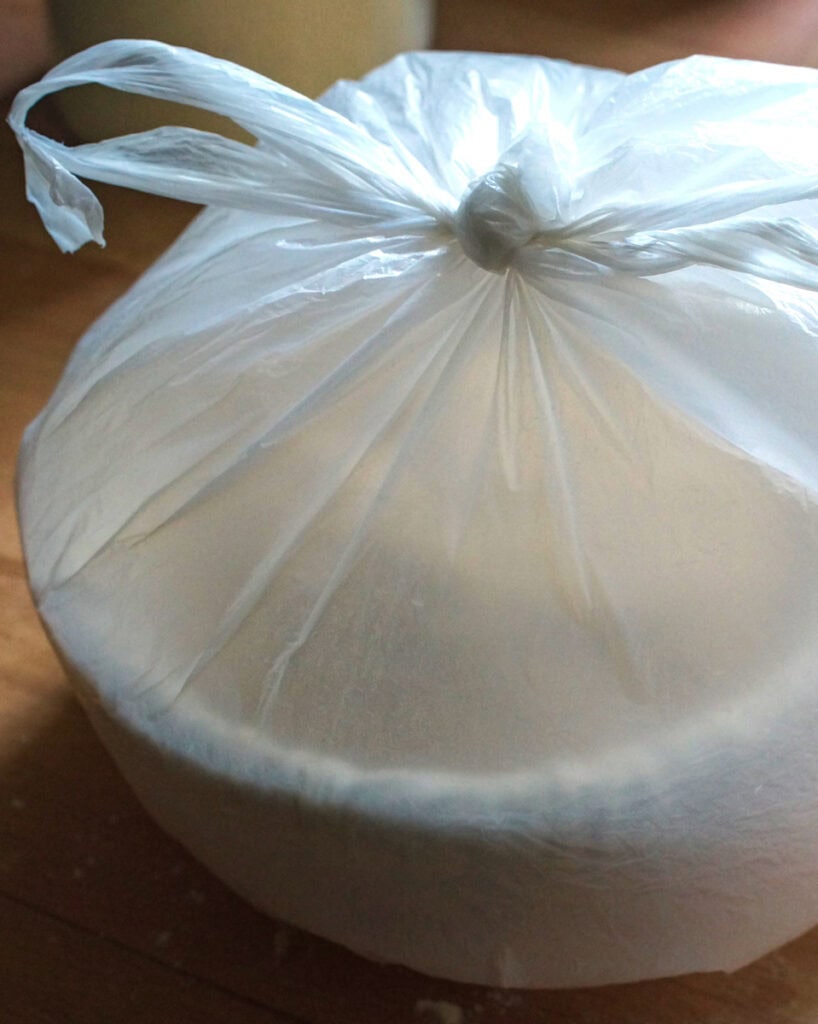
Cover the dough (a clean plastic bag or shower cap works well). Make sure the bag doesn’t touch the dough. Let it rest:
At room temperature for 30–60 minutes (up to 90 if your kitchen is cool), or in the fridge for up to 12 hours.
Cold proofing helps the dough hold its shape and improves flavor.
Note: For a long cold proof, shape the dough before it has fully doubled in size, to avoid over proofing. In my experience, freshly milled flour keeps fermenting in the fridge a lot longer, so I try to keep cold proofing times to below 2 hours for a fully doubled dough.
Note: Proofing times can vary depending on your starter’s strength and the type of flour you’re using.
Step 07
Score & Bake

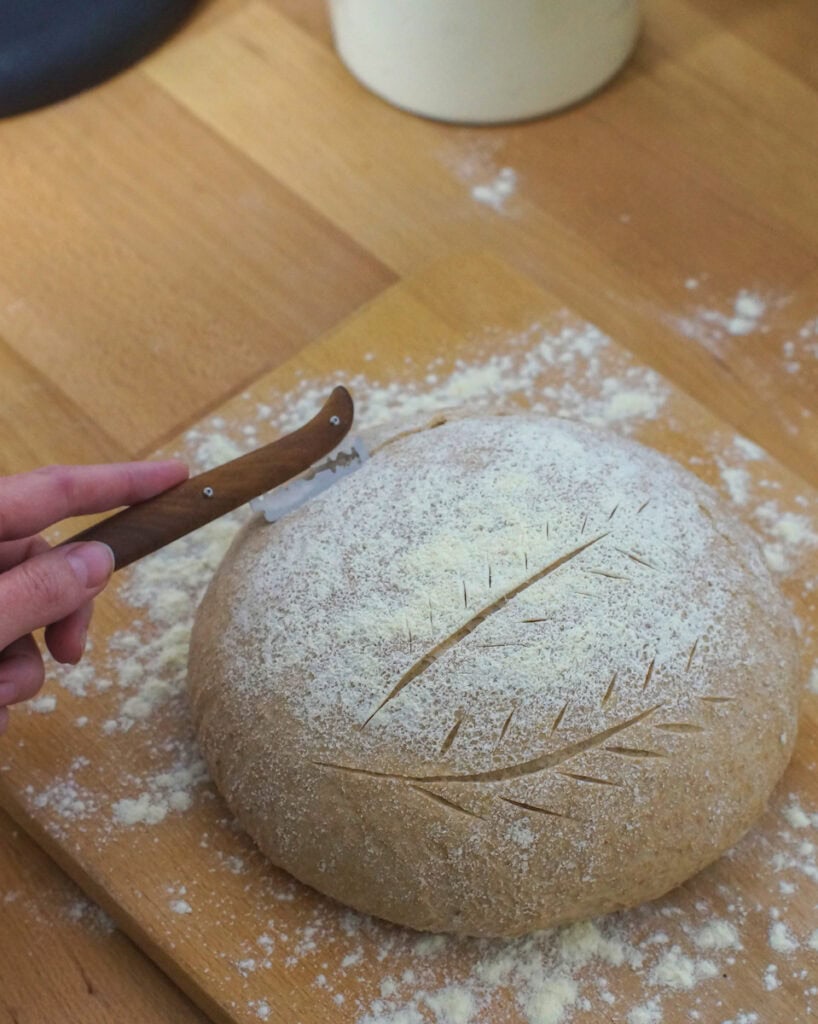

Note: For baking in a bread cloche, I prefer inverting the dough right into the hot pan and giving it a really quick score. Everything will be piping hot, so be very careful. Feel free to use a well floured wooden board instead and slide the dough in, or use good old parchment paper if you’re baking in a regular dutch oven.
Preheat your oven to 250°C (480°F) with a Dutch oven inside. Let it heat for at least 30 minutes.
Turn your dough out onto baking paper. Score it with a sharp blade at a 45° angle. You can add decorative scoring too if you like. Carefully lift the dough into the hot Dutch oven.
- Bake covered for 20 minutes at 210°C (410°F)
- Uncover and bake another 20 minutes, until golden and crisp
The bread should sound hollow when tapped on the bottom. Cool on a wire rack for at least 1 hour before slicing.


Variations
This dough is simple and flexible. Here’s how you can make it your own:
- Using up sourdough discard: Add up to 50g cold discard to the dough. If you add more, reduce the flour and water by equal parts.
- Enriched loaf: My favorite addition is 50g of butter and 1 tbsp of honey for extra moisture and softness. Reduce the water by 25g to balance and keep the dough manageable.
- Flavored liquids: Swap some or all of the water for milk, whey, apple or carrot juice, or the strained liquid from making pumpkin puree for subtle flavor changes. This might increase fermentation, so keep an eye on your dough.
How to Serve Whole Wheat Sourdough Bread
A more evenly textured, freshly milled soft wheat crumb comes with its own little set of advantages:
- No lost fillings: Perfect for grilled cheese or PB&J: nothing seeps through!
- Sturdy sandwiches: Holds up to spreads, pickles, and all the layers.
InfamousClassic German breakfast: Soft wheat bread is right at home with butter, deli meats, cheeses, and at least three kinds of jams, honey and nutella.


How to Store & Freeze Soft Wheat Sourdough Bread
This is a bit of a debated subject. What works best depends on your climate.
Storing bread
- Mold-prone kitchens: Let your bread breathe. Paper bags or a bread box work well.
- Dry or cold kitchens: Use a large ziplock bag or airtight container to keep bread soft.
Freezing bread
- Whole loaf: Let cool completely, wrap tightly in a freezer bag, and freeze for up to 3 months. Thaw overnight at room temperature (on a plate or paper towel to catch condensation).
- Sliced: Slice before freezing and layer parchment between slices. Reheat individual slices in the toaster as needed, no thawing required.
FAQs About Soft Wheat Sourdough Bread
If you make this freshly milled Soft wheat sourdough bread…
I’d love to hear how your loaf turned out!

P.S. Ratings and shares help others find this recipe too, and your feedback helps me keep these guides and recipes useful!
Freshly Milled Soft Wheat Sourdough Bread

Equipment
- grain mill
- stand mixer - (optional)
- dutch oven - (optional)
Ingredients
- 500 g freshly-milled soft wheat flour - (100%) or store-bought whole wheat flour (see Notes)
- 350-375 g water - (70-75%) depending on your batch of grains
- 10 g salt - (2%)
- 90 g sourdough starter, active and bubbly - (18%)
Instructions
Mix & Fermentolyse
- Grind your soft wheat berries on the finest setting.
- In a large bowl (or the bowl of a stand mixer), combine flour, water, salt and starter. Mix until no dry bits remain. The dough will be shaggy. Cover and rest for 30–60 minutes to rest (fermentolyse).
Knead (Choose one path1: stand mixer or by hand)
- Stand mixer: Switch to the dough hook and knead on low speed for 5–10 minutes, until smooth and stretchy. It should pass the windowpane test. If it doesn't form a windowpane after 10 minutes of kneading, perform 1–2 rounds of stretch and folds.
- By hand: Knead gently for 5–10 minutes until the dough comes together. It doesn’t need to be perfectly smooth, just cohesive and no longer sticky. Rest for 30 minutes, then continue with stretch and folds below.
Stretch & Folds (hand-kneading only)
- Wet your hands. Grab one side of the dough, stretch it up gently, and fold it over itself. Rotate the bowl a quarter turn and repeat at least 3 more times, or until you feel tension increasing. Let rest 20–30 minutes. Repeat for 2–3 total sets, letting the dough rest between rounds. After the final stretch and fold, cover and bulk ferment.
Bulk ferment
- Let the dough rise at room temperature for 5–7 hours.
Shape
- Lightly flour a banneton (or a medium bowl lined with a clean towel). Flour the counter and the dough’s top.
- Wet your hands and gently release the dough from the sides of the bowl. Turn it out, smooth side down. Shape into a rectangle, then fold the top third down, bottom third up, then fold the sides in like an envelope.
- Flip seam side down. Cup your hands around the dough and gently pull it toward you to build surface tension. Turn and repeat until taut. Place into your prepared banneton, seam side up.
Proof
- Cover the dough (a clean plastic bag or shower cap works well). Make sure the bag doesn’t touch the dough. Let it rest at room temp for 30–60 minutes (up to 90 if your kitchen is cool), or in the fridge for up to 12 hours.
Score & Bake
- Preheat your oven to 250°C (480°F) with a Dutch oven inside. Let it heat for at least 30 minutes.
- Turn your dough out onto baking paper. Score it with a sharp blade at a 45° angle. You can add decorative scoring too if you like.
- Carefully lift the dough into the hot Dutch oven. Drop temperature to 210°C (410°F) covered for 20 minutes.
- Uncover and bake another 20 minutes, until golden and crisp. The bread should sound hollow when tapped on the bottom.
- Cool on a wire rack for at least 1 hour before slicing.
Notes
This recipe is built for freshly milled soft wheat flour. In Europe, soft wheat berried are often labeled simply as “wheat.” You can use white, red, or yellow cultivars, though hydration needs will vary slightly.
If you don’t mill at home, you can find a list of suitable store-bought flour options in the post above. Hydration Tip:
Flours absorb water differently and sourdough starters vary. If the dough feels too dry, add more water in teaspoons. Too sticky? Add a touch more flour. Once mixed, the shaggy dough should feel soft and only slightly sticky, not wet or loose. Bulk Fermentation:
Ready when the dough is puffy, roughly doubled, and shows small bubbles. It should still feel structured and soft. Final Proof:
Timing depends on flour and starter strength.
More from the Grains & Greens Kitchen






)
Great recipe! I love how you explained everything in detail!
Thank you! I hope you’ll give it a try sometimes! 🙂
I am super excited to try a soft wheat version!
Let me know how it turned out! I love talking bread 😊
Finally, a recipe that makes sense of making sourdough in Europe! I baked sourdough for several years in the States, and it usually turned out great, looking like all the Instagram artisan loaves one sees. When I moved to Germany last year, every attempt ended in failure/tears/sticky messes. I just couldn’t figure out how to manage my bread dough, even after reading other bloggers’ recommendations to add vital wheat gluten to give it more strength and structure. Those were equally bad.
I’ve now made two loaves using your method. The first I made exactly as written in your recipe. For the second, I kneaded in a lot of mixed seeds (I also replaced some of the whole wheat flour with Dinkle/spelt). They both rose beautifully, had a tender and lovely crumb, and tasted delicious. I’m currently on my third loaf, using yet again a different combo of flours and seeds, and can’t wait to see how this one turns out. I’m optimistic — your base recipe is that good.
Thank you so much for your brilliant explanation, recipe, and method!
This! I never baked in the US but watched all the sourdough videos and mine never looked like them! I thought I did something wrong and tried and failed every single time. With this (and once I figured out bulk fermentation), I got consistently great loaves. I have tried any combination with Einkorn, Kamut and spelt or even a combination with these and wheat. They all worked. I only had to add flour when I tried it with Emmer because the dough was just too wet….
It’s just MAD how much of a difference your flour makes, even if it’s all technically “wheat”!
Especially when hard wheat refers to completely different things, depending of where you are in the world 😅
Gale, thank you so much for taking the time and letting me know this worked for you!!
I know exactly how you feel, I tried to make Instagram-style sourdough and it was a sticky, disappointing mess 😅 I thought it was me, until I realized that there are more varieties of wheat in the States. There’s also a chart on several blogs, that “converts” American flours to German flour types, and it’s way off! No matter how you mill soft wheat, it won’t magically turn into bread flour 😅
I’m so happy you enjoy baking bread again 🙂
Not sure what I am doing wrong. Third time making it . Keep getting really dense, gummy, uncooked inside ?
Using sprouted soft white, spelt, kamut. My stretch and folds are really taut. Doesn’t get past this stage . My starter is happy and normally produces nice bread with fresh milled bread – 60/40 spelt /hww. Any thoughts ??
Hi Karen!
Sorry to hear you’ve been having difficulties with my recipe!
Have you baked with sprouted soft wheat before? From what I can tell, sprouting changes the map a little in terms of hydration and enzyme activity.
Stretch and folds that are really taut sound like hydration is off, so I’d try adding more water next time.
A gummy, uncooked inside is most commonly a sign of underfermentation.
If you took photos of your crumb, you can send them over. Maybe we can work this out together!
Thanks so much! I will send pictures. I have not worked with sprouted much – so that very well may be it.
You recently commented on one of my posts in the fresh milled sourdough facebook group, but I cannot for the life of me find your comment! I was struggling and you offered this recipe as an alternative to try. I LOVE it! It’s literally the first FMF loaf I’ve made successfully, and two days in a row!! I have a 9×5 loaf pan dutch oven, so I use an oval banneton to proof, then drop it in my preheated dutch oven and it’s just beautiful! I’m so excited! And the flavor is AMAZING! I honestly like it much better than with hard red or hard white wheat! I had NO idea you could use soft wheat in bread! I use my Zacme mixer to get it to windowpane and it takes about 13 minutes, but it rises beautifully. Yesterday I followed the recipe exactly, and I felt the dough was too soupy. Today I added 10 gr more of flour, and it was perfect! Thank you for sharing this! I now have my new favorite recipe! One question though, since we’re a family of 6, we go through this loaf very quickly, and I’d like to double the recipe. Does anything need to change or do I just mix double of everything and it still comes together the same? Then separate it out after the bulk ferment? I was also thinking maybe since I only have one dutch oven, and don’t want the other to overproof, I could bake one the same day, and put the other in the fridge for longer ferment, and bake fresh the next morning. I followed your timeline exactly, because it just worked for me, so it would be in the fridge a little longer than 12 hrs. I don’t get up and bake at 4:30am, haha. Is that ok? Usually it’s about 8am before I get going. Thank you again!
Hi Laura,
I remember and I’m so happy this worked for you!!
Soft wheat is seriously underrepresented, I’m always happy when someone gives it a shot 🙂
You can scale the recipe without adjustments and divide the dough after bulk, no problem.
As for baking two loafs, I can see this going two ways.
I haven’t baked with a loaf pan dutch oven before, but if you can remove the bread from that kind of pan right away, I’d just chain bake two loafs in a row: When you remove the lid for the second part of the bake, keep it in the oven so it stays hot. Remove the finished bread from the hot dutch oven, drop in the second one, put on the lid and just keep baking. Keep the second banneton in the fridge while you bake the first loaf.
I line my regular loaf pans with baking paper along the long side, so I have a “sling” to lift out the bread (like this). Maybe that would work with your dutch oven as well?
Or, if you want to keep one banneton in the fridge longer, I’d shape the dough earlier, before it has doubled. Shape both loafs, put one in the fridge and let the other proof at room temperature. In my experience, the fridge is way less effective in stopping fermentation in fresh flour doughs, so it may need a little bit of trial and error to find the right timing. Whenever I put a fully doubled dough in the fridge, it over proofs in just a few hours.
I hope that helps!
Let me know how it goes! 🙂
Will this recipe work with Sunrise Heritage flours? I cannot mill my own flour, so maybe their flour is close to it? Thanks!
Hi, sorry for the late reply (my spam filter thought he was smarter than us).
Their heritage whole wheat pastry flour looks like it should be just right for the job!
My family grows soft-white-wheat in eastern Washington state. I have been searching for this recipe for a while now. God bless you. I have a Diamante mill, and all the tools I need, but could not find a recipe with the right hydration and autolyze. This is perfect. I’m going to try all your recipes for soft-white now.
Oh my, baking with your own wheat sounds like a dream ❤️
I’m so happy my recipe can be a part of it!
Thanks for reaching out and letting me know 😊
Hi Sarah!
You share about letting it double, but I wanted to ask what temperature your kitchen is at? Typically for regular sourdough I’d vary it depending on temperature of the dough and I find that with FMF and my mixer, the dough can run quite warm! Would you recommend a smaller size in this case? I do like to do a cold proof on all my sourdoughs. I also don’t want to underproof! Thanks!!
Hi Kianna!
My kitchen is usually on the warmer side, 21-23C (69-76F).
And I know what you mean about warm fresh milled doughs! Mine often overproof in my fridge (it’s old and doesn’t get quite cold enough). They keep fermenting a lot longer than regular sourdough in the fridge in my experience.
So if you want to do a longer cold proof, I would not wait for the dough to double. I’d wait until it’s risen around 60%, then shape and cold proof.
Also, the enzymes in FMF stay active in the cold longer than the wild yeasts, and keep weakening the gluten structure in the fridge. So I wouldn’t start out with a super long cold proof.
It’ll take a little trial and error I’m afraid, to find a schedule that works in your kitchen but I’m sure it’s worth it!
Hope that helps 🙂